Saturday, March 27, 2010

The Baby Bargello

So I've discovered that I really love quilting. Not the traditional American patchwork like Amish quilts;the more contemporary projects are my style. It's pretty amazing how a stack of fabric can be turned into something beautiful with just some clever cutting and piecing. I hope I can build my skills until I create projects that are more art than craft.

But that's a way off. In the meantime, I wanted to document a project from beginning to the end. It's my third blanket and a gift for my new nephew when he arrives in June. If you're a quilter and you see any mistakes, please let me know! I'm still learning and I need all the help I can get.


Aren't they pretty? All batiks, which are so nice to work with and are works of art in themselves. Mary at Tangled Threads here in Peterborough spent a good hour with me choosing the colours. She and all her staff are so patient and helpful with newbies! I think she did a pretty good job here.

So step one was to wash and dry all the fabrics.


Then comes the pressing. I've learned the hard way that there's a distinct difference between ironing and pressing. Pressing- the right way- takes much longer. Gotta do both sides, too.


Cutting off the selvages:
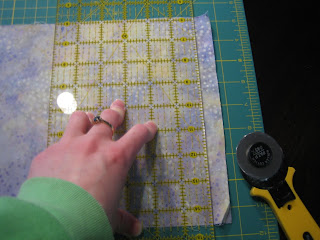


Then cutting the strips:


Until there's two strips of each:


Then sew them together. I have them numbered to keep them in order.


Once they're all pieced together and the seams are properly pressed, it looks like this:


Now's here's where the "bargello" bit comes in. It's a unique way of creating a flowing wavy pattern. I sewed the first strip to the last, making a strippy tube.


Then more strips are cut perpendicularly to the first ones.


The trick now is to pick apart the seams at specific places to make the pattern. It doesn't take as long as you'd think.


Next, sew those together. Mango "helped" me with that part.


Up until this point, it was smooth sailing. The I realized that I pressed some seams the wrong way and they weren't going to nest together properly. They're supposed to point in opposite directions, but they didn't. See:


It was a pain to go back and re-press, but it was necessary. Finally, the pattern emerged:


And I added on some borders:


I was pretty happy with the corners.


I chose a heart-shaped meander pattern for the quilting. I found out later it was a bit of an ambitious undertaking for a newbie. It took 2 hours to trace on. I used a yellow pencil...big mistake. It never washed out completely later.


Then the top is layered with the batting and some flannel for the back. Unfortunately, I chose to pin it on top of my freshly-refinished table and I gouged the finish. I couldn't take a picture. Too traumatic.


Next I set up my brand new to me borrowed Husqvarna machine to do the quilting. I practiced a bit since there's a knack to it.


Now the biggest pisser of this project:


The damn thread broke again and again and again. I fiddled with the machine for a whole evening and was ready to pitch it through my living room window. In the end, I was so flustered while practicing that I let my hand slip under the needle and it went right through my finger. I have a picture but trust me, you don't want to see it. More blood than you'd think. Gah.

I had to walk away for three days and cool off and let the finger heal up. In the meantime, I got some advice to change the thread, which reduced the breakage from every 15 seconds to every 10 minutes. I was willing to live with that.


But it was still a piss-off.

Keeping my fingers well away from the pointy bits:


It took a whole afternoon, but the quilting was done. Am I totally happy? Course not. But it'll do.

Squaring off the edges:


Then sewing on the French binding:


I flipped over the binding and hand sewed it to the back. Done! All together, it's about 10 or 11 hours of work, not including screwing around time dealing with the thread issue. Despite that, it was a fun project and the time just flew by. I'm already planning the next one!


Monday, March 15, 2010

Table pics

It took me a while to get around to posting about the finished table...it was a bit traumatic to have to do what I did. I needed some time to enjoy the table to be sure it was all worth it. Saving it meant stripping off the shellac with alcohol and scraping the resulting goo into a garbage bag.

Sick.


So after two hours of scraping and buffing with steel wool all the finish was off. The headache from the fumes lasted much longer.


The steel wool raised some of the colour of the original finish so I painted on some ebony stain to darken it a bit.


Then came three coats of oil based urethane and tada:


It was WAAAYY more work than I figured, which is par for the course for me. But it classes up the joint so much it was worth it!

Friday, January 22, 2010

Stick a fork in it

It's done! Only a month after I started. Considering my track record, that's pretty good. I had to go back to bare wood and pretty much start from scratch.

I'll post some more pictures when I get a chance. Next project is starting a veggie garden from seed. Any recommendations on heirloom veggies or on seed houses to order from?

Thursday, January 7, 2010

Wax On, Wax Off

Putting the wax on was incredibly easy. I scooped a bit into some cheesecloth:


and balled it up. I rubbed it on in nice little circles.


Then it dried kind of cloudy.


I used a rag and rubbed the hell out of it to get back the shine. It took a good twenty minutes of strong buffing to get it presentable.

To be honest, I was not happy with the results. At all. The steel wool raised imperfections in the shellac that didn't buff out with the wax, as well as streak marks along the grain. But I figured I was too close to the project, so I threw a table cloth over it and decided to check it later to see if it was really that bad.

So this morning I pulled up a chair and enjoyed breakfast on a table for the first time in two weeks. After, I peeked under the tablecloth and saw this:


You might not be able to make it out, but that's about half a dozen rings from my mug pressed into the finish. I was also incredibly pleased about this:


Yup, those are paw prints from the fattest cat around, Bacchus. (Really, I'm only guessing it was him because he's the meanest of our cat herd.) Not just smudges, but actual prints embedded in the finish. Anywhere pressure was applied, it left a mark- from paws, elbows, plates, and especially from my forehead where I smashed it in frustration.

Not happy. If anyone out there in Interweb Land knows why this happened, please tell me! I'm heading to a specialty shop this weekend for some expert advice on how to salvage all my work, but if you have any ideas, please let me know.

This sucks.

Monday, January 4, 2010

Table - Days 4,5, and 6

After drying for a full day, the super thick layer of shellac looked like crap. It had some awful lap marks and was truly uneven. Yuck. So I whipped out the sand paper and spent over two hours sanding by hand trying to get out every little imperfection. About 10 sheets of paper and a bout with Carpal Tunnel later, it looked like this:


The dust was everywhere, including in my lungs and sinuses. Should've worn a mask...gotta love retrospect.

I clean it all up, mopped (I've mopped more in the last week than in the last year!) and tack-clothed it again. Before putting on another coat of shellac, I thinned it even more with methyl hydrate.


Now, notice how I set up this shot ON the table I'm trying to restore?

Dumb. Dumb. Dumb. Think about it. I took the bottle of finish solvent and poured it out on top of the damn finish itself! After I took the pic, I lifted off the bottle and can, only to see some lovely rings and splatters melted into the table top. Duh.

(You'll have to imagine what the marks looked like, since I was so pissed off about it I didn't take a picture.)

So after calming down, I carefully applied another THIN layer, let it dry a few hours, and sanded with 220 grit. Then I wiped, swept, mopped, and tack-clothed again. Then I repeated the whole process another 4 times.

By the end of it, I was pretty good at laying on a thin, even layer of shellac and the table was all glossy.


So now that it was all glossy and gorgeous, I was done, right?

Wrong. Time to bring this out...


...and rub off all that pretty shine. Gloves please:


Now it has to cure for another 2 days and I can rub in the wax-- the last step. I'll have the final reveal ready later this week!

Friday, January 1, 2010

Almond Meringue Cake

In between coats of shellac, I decided to try a fancy dessert for some New Year's festivities last night. I saw this recipe on French Food At Home a while back and thought I'd give it a whirl. I've never had much luck with either meringues or with candy making, and this recipe involved both...so it was a bit of a risk.

This is how it's supposed to look:


I started by chopping up the almonds. It calls for ground almonds, which I didn't have, so I chopped them by hand. After 20 minutes of chopping, I kind of entered into a Zen-like state and became fixated on making big beige bits turn into small beige bits. It was a bit unnerving once I snapped out of it. If you're planning on making this, I don't recommend chopping them yourself unless you missed your meditation class and need to zone out.

Anyways, I combined that with some sugar and cornstarch to fold in later.


I used Betty, the handy dandy Kitchen Aid, to whip up the egg whites and sugar to make a meringue. This is the part I always screw up by beating them too long until they break down into a gooey, watery mess. Thankfully, it went better today.


Then I folded in the almond mixture. This is the other part I always screw up, this time by adding the other crap too fast and deflating the whites. But, Lady Luck was with me and it worked out.


I traced out some circles on parchment and spread out the meringues. The recipe calls for using a piping bag, but I don't have one and am too lazy to make one, so I used a spoon.

In the oven it went, set at 275 F. Took a good 1.5 hours to crisp up. I checked it after 45 minutes and left a big thumbprint in one of them. Oops.


On to the buttercream. Now here's ANOTHER part I always screw up. I had to heat the sugar to 239 F exactly. I always, always burn sugar if I'm making candy or something- so much so that I'd pretty much given up trying. But Santa brought me a new thermometer and I think it made the difference.


Next came pouring the lava-hot syrup into egg yolks while Betty was whirring away at high speed. Oh and taking a picture of it at the same time. And dodging the searing little bits of caramelized sugar flying out. My recommendation: don't try photography while you're at this!

Once that whipped up and got cool, it got a good dose of nice soft butter and was whipped some more until it looked like this:


I had to try some, right? I'd never had buttercream before. Let me tell you, it was a revelation! Like, why is this not offered as a standard condiment in restaurants? Why do we not keep jars of this stuff in the fridge to smear on toast? Do you know how good this is? Do you? I feel like I need to spread the gospel of buttercream.

This is a dangerous development for me. Not to mention it was a challenge to get my tongue around each of the wires on the beater when all was said and done.

Anyways, I got so excited about this that I didn't make the connection between butter and heat. In that, if you spread frosting (whose main ingredient is butter) on a hot meringue, it would melt. See:


Don't do that. It makes you panicky. I had to shove the whole thing in the freezer before it all melted off.

After that crisis was averted, I finished layering the cake with buttercream and fruit. The recipe called for peaches, but the store didn't have any. So I settled on blueberries and some canned peaches. Here's the final product:


I have to say it turned out pretty tasty. It doesn't look anything like the cake in the show, but who cares? Rustic is in, right?

Next time, I'd try different fruits like raspberries or or poached pears maybe. It was a bit time consuming to make, but totally worth the effort. If you want to try it, you can get the recipe here. Let me know how it goes.